
- turn off push notifications
- Turn Off Push Notifications On Phones: Step-By-Step Instructions For Various Devices
- Option 1: Adjusting App-Specific Settings In The Settings App
- Option 2: Changing Individual Notification Settings By Swiping Down
- Some Apps Have Their Own Notification Settings Within The App Itself
- Managing Push Notifications On macOS
- Disabling Push Notifications On Android Devices
- Managing Push Notifications On iOS Devices
- Controlling Push Notifications On Web Browsers And Specific Apps
In our fast-paced world, it’s easy to get overwhelmed by the constant buzz of notifications, stealing our focus and disrupting our daily flow. But what if there was a way to take back control?

Enter the power of turning off pushnotifications. With a few simple taps, you can silence the seemingly never-ending stream of beeps and alerts, giving yourself the freedom to concentrate and immerse in what truly matters.
Whether you’re seeking a moment of tranquility, a boost in productivity, or simply some peace of mind, join us as we explore the various techniques and options available across different devices. Get ready to reclaim your attention and dive into a world free from digital distractions.

| Item | Details |
|---|---|
| Topic | Turn off push notifications: How to take control |
| Category | Ads |
| Key takeaway | In our fast-paced world, it's easy to get overwhelmed by the constant buzz of notifications, stealing our focus and disrupting our daily flow. |
| Last updated | December 27, 2025 |
push-notifications">turn off push notifications
To turn off push notifications on your phone, you have a few options depending on the device. For iOS devices, go to Settings > Notifications to manage push notifications for specific apps, and you can also enable “Do Not Disturb” to further reduce interruptions.
On Android devices, navigate to Settings > Apps & Notifications > Notifications to disable push notifications for apps. On macOS, go to System Preferences > Notifications to control push notifications for specific apps.

Additionally, web browsers like Chrome, Safari, Firefox, and Edge allow you to disable or block push notifications in their settings. For individual apps like Facebook and Gmail, you can access their settings to choose which types of notifications to disable.
By customizing push notifications, you can reduce distractions and better manage your online experiences.

Key Points:
- For iOS devices, go to Settings > Notifications to manage push notifications for specific apps.
- Enable “Do Not Disturb” on iOS devices to reduce interruptions further.
- On Android devices, navigate to Settings > Apps & Notifications > Notifications to disable push notifications for apps.
- On macOS, go to System Preferences > Notifications to control push notifications for specific apps.
- Web browsers like Chrome, Safari, Firefox, and Edge allow you to disable or block push notifications in their settings.
- Customize push notifications in individual apps like Facebook and Gmail to choose which types of notifications to disable.
Sources
https://support.google.com/android/answer/9079661?hl=en
https://kinsta.com/blog/turn-off-push-notifications/
https://support.apple.com/guide/iphone/change-notification-settings-iph7c3d96bab/ios
https://www.pcmag.com/how-to/how-to-disable-web-notifications

Check this out:
💡 Pro Tips:
1. Tip: Consider the importance of each app before turning off push notifications. Some apps, like messaging or emergency alerts, may be necessary to keep on.
2. Tip: Use the “Quiet Hours” setting on iOS to automatically silence push notifications during specific times of the day or night.

3. Tip: Take advantage of “Priority Only” mode on Android devices to only receive important notifications from select apps during specific times.
4. Tip: Utilize the “Deliver Quietly” option on iOS to have notifications go straight to the notification center without causing interruptions.
5. Tip: Regularly review and update your notification settings as new apps are installed or as your needs change.

Turn Off Push Notifications On Phones: Step-By-Step Instructions For Various Devices
In today’s digital age, where constant notifications bombard us with information, it’s essential to find ways to reduce distractions and take control of our online experiences. One effective method is to turn off push notifications on our phones.
However, the process for doing so can vary depending on the device you are using. This article will provide step-by-step instructions for turning off push notifications on different devices, including smartphones, macOS, Android, iOS, web browsers, and specific apps.
Option 1: Adjusting App-Specific Settings In The Settings App
One way to control push notifications is through the Settings app on your device. Here’s how you can do it:

- Open the Settings app on your phone.
- Look for the “Notifications” or “App settings” option and tap on it.
- Scroll through the list of apps and select the specific app for which you want to adjust the notification settings.
- Within the app settings, you can typically customize various options such as enabling or disabling push notifications, controlling the sounds or vibrations associated with notifications, and choosing the priority level for notifications.
Remember, these steps may vary slightly depending on the operating system of your device. It’s important to explore the Settings app to find the relevant options for managing push notifications effectively.
Option 2: Changing Individual Notification Settings By Swiping Down
Another quick way to adjust notification settings is by accessing them directly from the notification panel. Follow these steps:
- Swipe down from the top of your device’s screen to reveal the notification panel.
- Look for the gear icon or the “Settings” option and tap on it.
- This will take you directly to the notification settings, where you can adjust options for individual apps or customize the global notification settings.
It’s worth noting that this method may not be available on all devices or may vary depending on the manufacturer’s user interface. Be sure to explore your device’s features to find the notification settings.

Some Apps Have Their Own Notification Settings Within The App Itself
Certain apps have their own notification settings, separate from the system-wide options. To manage push notifications for these apps, follow these instructions:
- Open the app for which you want to adjust the notification settings.
- Look for the app’s settings menu, denoted by an icon like a gear or three vertical dots.
- Within the app’s settings, locate the “Notifications” or “Notification Settings” option.
- From there, you can customize the app-specific push notification settings to your preference.
It’s important to note that not all apps offer this level of control over notifications. However, for apps that do, it provides a convenient way to tailor the notification experience according to your needs.
Managing Push Notifications On macOS
If you’re using a macOS device, you can control push notifications through the System Preferences. Here’s how:
- Click on the Apple logo in the top left corner of your screen and select “System Preferences.”
2.
In the System Preferences window, find and click on the “Notifications” option. 3.
This will display a list of apps on the left-hand side, with notification settings on the right. 4.
Choose the specific app for which you want to adjust push notification settings. 5.
Customize the notification preferences for that app, such as activating or deactivating notifications, adjusting their appearance, or modifying the alert style.
By utilizing the System Preferences on macOS, you can fine-tune push notifications on your device and prevent unnecessary distractions.
Disabling Push Notifications On Android Devices
Android devices offer a straightforward way to disable push notifications. Just follow these steps:
- Open the Settings app on your Android device.
- Scroll down or search for the “Apps & Notifications” option and tap on it.
- Within the “Apps & Notifications” menu, look for the “Notifications” section and tap on it.
- Now, you can explore different options for managing notifications, such as turning off notifications for specific apps, adjusting the behavior of notifications, or enabling “Do Not Disturb” mode.
Android devices provide extensive control over push notifications, allowing you to customize your experience to align with your preferences and priorities.
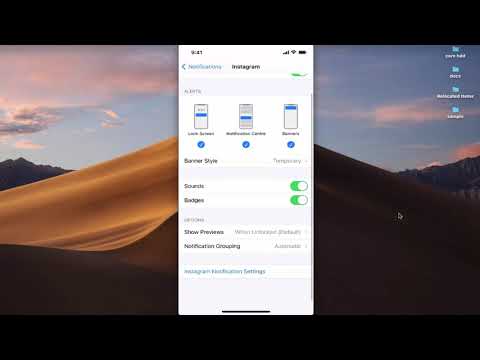
Managing Push Notifications On iOS Devices
For iOS devices, managing push notifications is a breeze. Here’s how you can do it:
- Open the Settings app on your iOS device.
- Scroll down and tap on the “Notifications” option.
- This will present you with a list of all installed apps on your device.
- Select the specific app for which you want to manage push notifications.
- From here, you can toggle notifications on or off, configure notification styles, sounds, badges, and even enable “Do Not Disturb” mode for that particular app.
iOS devices offer comprehensive control over push notifications, empowering you to tailor your experience and minimize distractions.
Controlling Push Notifications On Web Browsers And Specific Apps
In addition to smartphones and desktop operating systems, you can also manage push notifications on web browsers and specific apps. Here are some methods:
- Web Browsers (e.g., Chrome, Safari, Firefox, Edge): Within the browser settings, you can find options to disable or block push notifications. Look for the “Notifications” or similar setting and customize to your preference.
- Facebook: Access the settings menu within the Facebook app or website. Look for the “Notifications” option and choose which types of notifications to disable.
- Gmail: Open the Gmail app or website, then tap on the menu icon (three horizontal lines) in the top left corner. Scroll down and select “Settings.” Within the settings menu, choose the Gmail account for which you want to manage notifications and turn off push email notifications.
By customizing push notifications on web browsers and specific apps, you can further refine your online experience and minimize interruptions when using these platforms.
In conclusion, turning off push notifications is a powerful way to take control of your digital life. Whether you’re using a smartphone, macOS, Android, iOS, web browsers, or specific apps, there are various methods to manage push notifications effectively.
By following the step-by-step instructions provided in this article, you can reduce distractions, increase focus, and create a more balanced and fulfilling online experience. Remember, it’s essential to customize your notification preferences according to your needs and priorities.
So, take charge today and enjoy a more peaceful and productive digital journey.
New optimization tips included — stay ahead.
Performance Marketing Tips • Native Ad Network • Buy Traffic • Advertising Platform for Marketers • Self-Serve DSP Platform